Build & deploy the iOS app
1.Build first iOS binary 🕐 / 📱
- Check if you are already logged in to your eas/expo account
- In the terminal run the build command (choose the proper environment (qa/staging/production).
- You will be asked to log in to your Apple account, please log in.
- Choose your team and provider (possible binarapps if you deploy qa app).
If it will be your first build of the iOS app, you will be prompted to generate a new Apple Distribution Certificate." If it is a new app please select y, otherwise, if you have Apple Distribution Certificate (.p12 file) you can press n and provide a path to .p12 certificate.
If it will be your first build of the iOS app, you will be prompted to generate a new Provisioning Profile.
If you do not have Provisioning Profile please select y to generate a new one, otherwise, if you have Provisioning Profile (.mobileprovision file) you can press n and provide a path to .mobileprovision certificate.
If it will be your first build of an iOS app, you will be asked to set Push Notifications for your project.
You can select y in case later you could need it, and generate a new Apple Push key.
eas whoami
If not please log in to your account before proceeding to the next step.
yarn build:[qa/staging/production]:ios
CONGRATULATION !! 🥳🥳 You just started your first IOS build of the QA app version!
2.Deploy the first iOS app version for tests in TestFlight. 🕐 / 📱
Creating new apps in App Store Connect
When you created an iOS binary (your build is in progress or at least you've generated Distribution Certificate (.p12 file) and Provisioning Profile (.mobileprovision file)), you are ready to create and configure apps in App Store Connect.
- Log in to App Store Connect to the account you were logged in to while building the app in the previous step.
Create a new app.
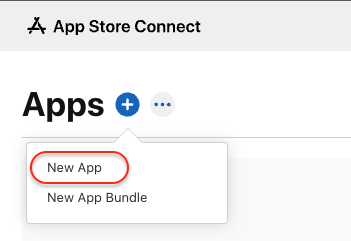
1.Got to the Apps tab.
2.Click on the +button to create a new app.
 3.Select New app from the popup.
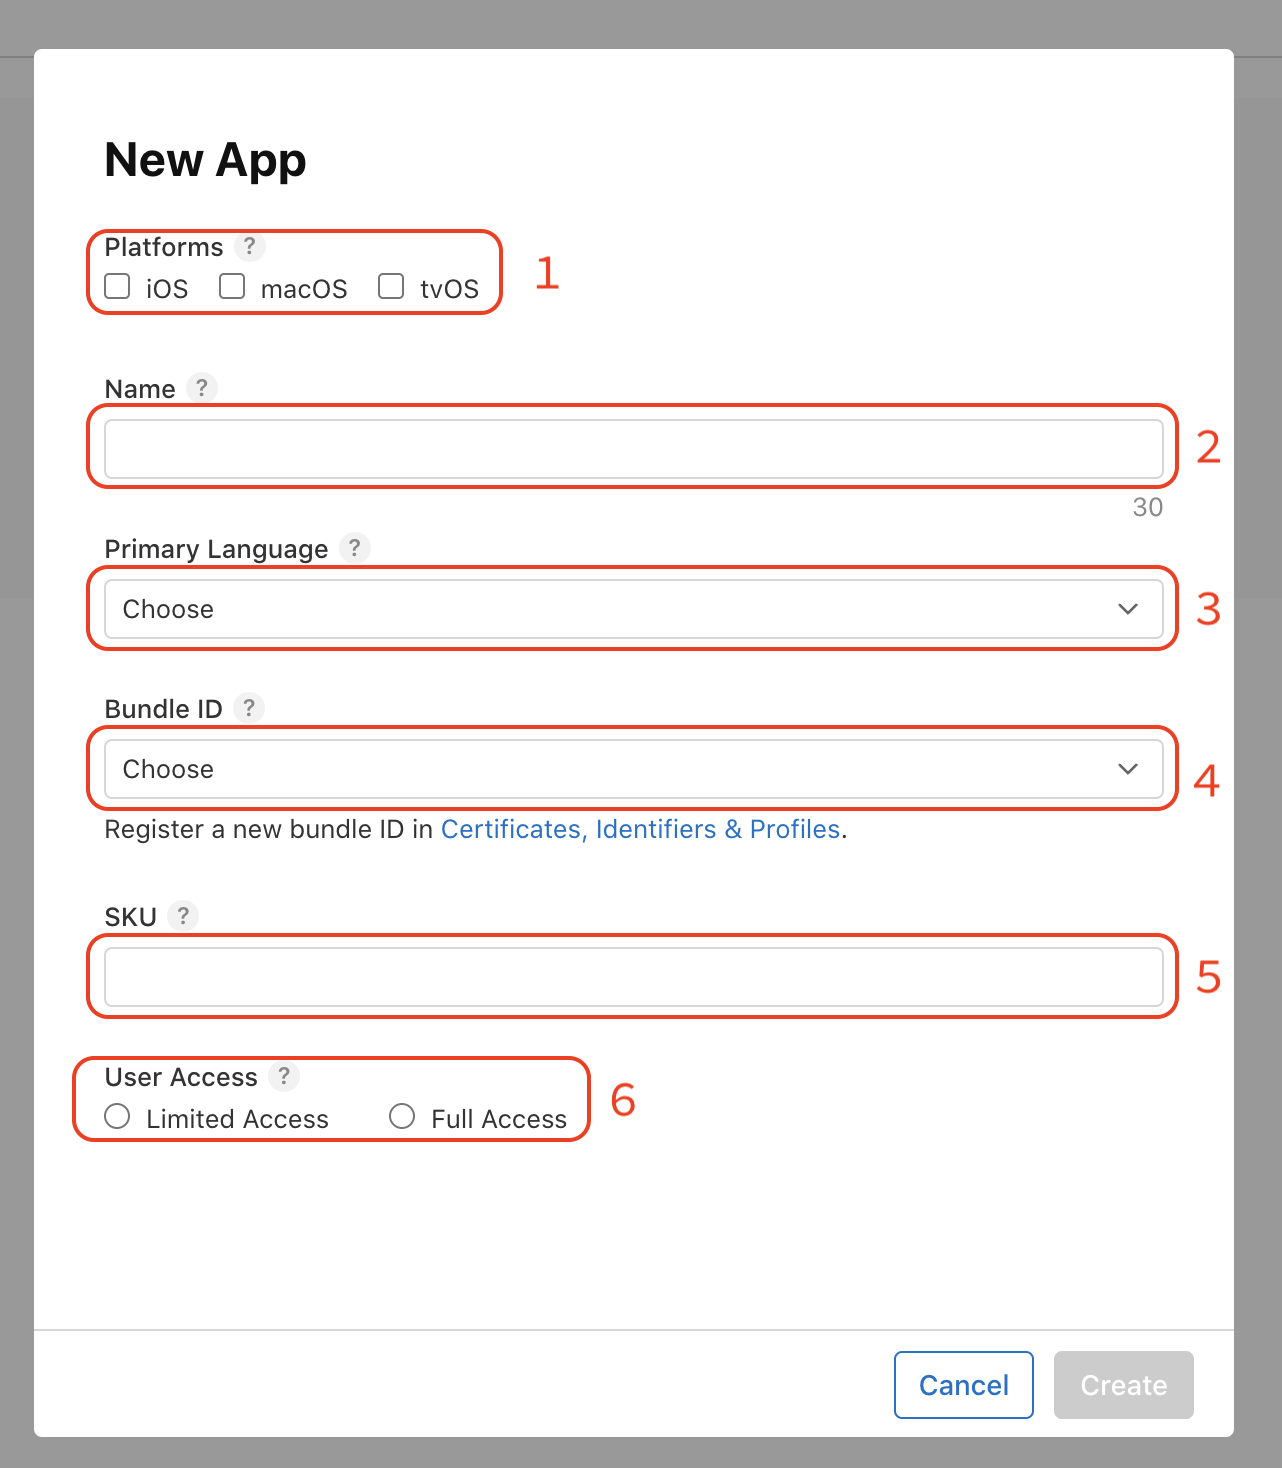
4.Fill out the questionnaire about the newly created app.

Fields description:
1)Choose the platform which you want to support (probably only iOS).
2)Add your app name. Depending on the type of your app, you are creating:
a)your app name (qa)
b)your app name (staging)
c)your app name
3)Choose your primary language (English, Polish, or some other).
4)Choose your bundle id.
When you went through the building app process correctly you should be able to choose the bundle id created for your app for example: binarappsYOURAPPNAME 344h234g234d23423f4234 - com.binarapps.yourappname - last part is your app bundle id, you should choose accurate to the app version (qa/staging/production)
5)You need to pass a unique ID that will not be visible in the store, it could be your bundle id for example com.binarapps.yourappname.qa
6)You could choose limited access, only accounts with the role: Admins, Finance, and Reports, and people you add access will see the app in the App Store account
- Create and go through step ii again to cover qa/staging/production app depending on your strategy.
Submit the app to the Test Flight.
Configure eas.json file.
"submit": {
   "production": {
     "ios": {
       "ascAppId": "your_appStore_app_id",
       "appleTeamId": "your_apple_team_id",
       "appName": "your_app_name"
     }
   },
   "staging": {
     "ios": {
       "ascAppId": "your_appStore_app_id",
       "appleTeamId": "your_apple_team_id",
       "appName": "your_app_name"
     }
   },
   "qa": {
     "ios": {
       "ascAppId": "your_appStore_app_id",
       "appleTeamId": "your_apple_team_id",
       "appName": "your_app_name"
     }
   }
 }
Where:
- your_appStore_app_id should be taken in that way.
- your_apple_team_id should be taken from Apple Developer Portal in that way.
- your_app_name should be your app name from App Store Connect.
The first submission - authenticate the app submission process.
You can authenticate your builds in two different ways:
1.App Store Connect API Key.
To use this method you will need access to the App Store Connect account with the role of Account Holder. If you do not have such access, please authenticate with method
- Generate API key - follow the instruction.
- Save AuthKey.p8 file, key ID, and Issuer ID.
Ensure that the build you want to submit is completed correctly.
In project dir terminal run:
eas build:list --channel [qa/staging/production]And check the last build. (choose the proper channel depending on your build/app environment)
Start the submission process, in project dir run the following command:
eas submit -p ios --latestIf you want to submit a different build than the latest one, you can run:
eas submit -p ios --id your_build_idWhere in place of your_build_id you could pass the id of the build from the build list (previous step).
For the first submission you will need to go through the following questions:
- Select what to use for your project: Add a new ASC API Key
- Generate a new App Store Connect API Key: no
- Path to App Store Connect API Key: AuthKey_YOUR-KEY-ID.p8
- Key ID: YOUR-KEY-ID (to be get from the instruction)
- Issuer ID: YOUR-ISSUER-ID (to be get from the instruction)
After applying this data submission process will start. CONGRATULATIONS !! 🥳🥳 You have just started your first iOS build submission!
2.Apple App-Specific Password.
Generate App-Specific Password - follow the instruction.
You can name your App-specific password for example as EAS submit.
- Copy the newly generated password. (if not copied, please create a new App-Specific Password, and remove the previous one).
Store password in expo service (we will name it → EXPO_APPLE_APP_SPECIFIC_PASSWORD).
In project dir terminal run:
eas secret:create --scope project --name EXPO_APPLE_APP_SPECIFIC_PASSWORD --value YOUR_GENERATED_APP_SPECIFIC_PASSWORD --type stringIn place of YOUR_GENERATED_APP_SPECIFIC_PASSWORD provide your generated password.
Configure eas.json file, to authenticate the submission process with your App-Specific Password.
Add the following lines (do not remove existing configuration added in 4.b.i step).
"submit": {
    "production": {
      "ios": {
        "appleId": "your_apple_id",
      }
    },
    "staging": {
      "ios": {
        "appleId": "your_apple_id",
      }
    },
    "qa": {
      "ios": {
        "appleId": "your_apple_id",
      }
    }
}
Where your_apple_id is your apple ID with access to App Store Connect. (for example m.baumruck@binarapps.com)
Store your apple account password as an expo secret in the expo service.
To allow other users and CI to submit the app to the store, and sign in with an app-specific password, you need to allow expo services to authenticate with your account. To do that, expo service will log in to your apple account with your apple id (provided in eas.json in the previous step and apple password (stored as a secret on the expo service).
In project dir terminal run:
eas secret:create --scope project --name EXPO_APPLE_PASSWORD --value YOUR_APPLE_PASSWORD --type stringIn place of YOUR_APPLE_PASSWORD provide your apple password.
Start the submission process, in project dir run the following command:
eas submit -p ios --latestIf you want to submit a different build than the latest one, you can run:
eas submit -p ios --id your_build_idWhere in place of your_build_id you could pass the id of the build from the build list (previous step).
CONGRATULATIONS !! 🥳🥳 You have just started your first iOS build submission!
3.Build and deploy the next versions of the app to TestFlight. 🕐 / 📱
To run this step, ensure that you already have built and deployed the first version of the app (it means, that you need to go through steps 3 and 4 for qa/staging/production version of the app depending on your needs)
In project dir run in terminal:
yarn deploy:[qa/staging/production]:ios
Choose the proper app version depending on the environment for which you want to create a build.